
Hello World is the first program a developer writes to check if their setup is working properly.
As a kind of “Hello World” for my blog, I wanted to show how I created this site, starting from the Static Site Generator I chose - Hugo - and ending with showing how I hosted everything on Cloudflare using Pages.
Disclaimer #
It might seem quite paradoxical that an open-source enthusiast would host their site on Cloudflare1 and even make a tutorial about it.
I just want to make clear that this is a temporary setup, suitable even for those who can’t self-host a website, for security reasons or the CGNAT2 (damned IPv4).
For those interested, I’m making an article about how to forward the port through CGNAT, but for now let’s continue using the damned Cloudflare.
Creating a site with Hugo #
To manage all the content on this site, I use Hugo, a static site generator that allows me to write pages and articles in a simple markup language, like Markdown. Hugo will then take the content and a theme and combine them, producing static HTML, CSS and JavaScript.
To get started, you need to install Hugo and create a new project:
hugo new site <site-name>
cd <site-name>
git init
If you want to view your site on a development server:
hugo serverNow at the URL http://localhost:1313/, you should see a 404: Page Not Found. To fix this problem, we need to install a theme.
Choosing a theme #
To get an idea of which themes we can install, we can go to the “Themes” section of Hugo’s website. We can create our own theme from scratch if we want, there are several tutorials online about that.
For simplicity’s sake, for this tutorial, I’ll choose the PaperMod theme.
To add a theme, you first need to download it as a Git submodule into the
themes/ directory:
git submodule add --depth=1 https://github.com/adityatelange/hugo-PaperMod.git themes/papermodThen you need to specify the theme that Hugo should use in the configuration file:
echo "theme = 'papermod'" >> hugo.tomlIf we restart the development server, we should see a page similar to this:

Our site is finally starting to look a bit more colorful, but it’s still too plain and generic for my taste.
Customizing the site #
To make the site less generic, you need to modify the configuration files. For
example, we can change the first variables in hugo.toml:
baseURL = 'https://example.org/'
languageCode = 'en-us'
title = 'My New Hugo Site'
theme = 'papermod'
To thoroughly configure the site, you need to consult the documentation for the chosen theme. This is the documentation for the PaperMod theme.
Unfortunately, there is no common documentation for all themes, so you need to take some time and read through your theme’s documentation.
Adding articles #
Now our blog looks nice, but at the moment, it’s a bit empty. We can fix this by creating our first article:
hugo new content posts/<article-name>.mdWith this command, Hugo will copy the archetypes/default.md file to the
contents/posts/ path, rename it, and substitute the variables:
+++
title = 'Article Name'
date = 2024-04-22T00:00:00+02:00
draft = true
+++
I would like to point out the draft = true variable in our article’s
preamble: when this is set to true, Hugo hides the article during
compilation, so you can compile the entire site without worrying about
displaying incomplete articles.
However, you can still display drafts when running the dev server by passing
the --buildDrafts argument to the hugo server command.
Now you can start writing your post using the Markdown language:
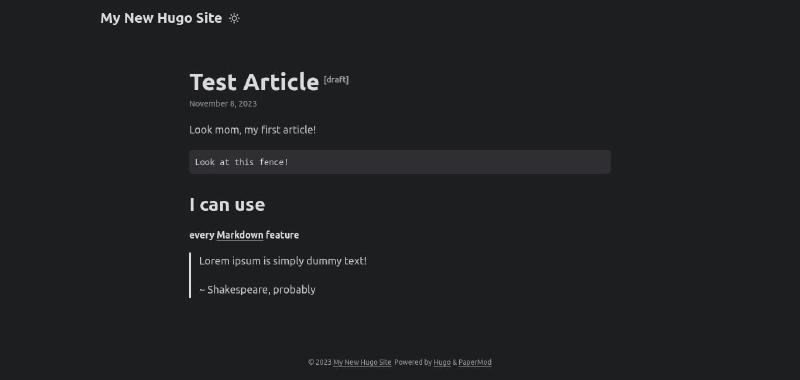
Once we’ve finished writing our articles, we can compile our blog using the command:
hugoThe compiled output can be found in the public/ directory.
Publishing the site with Cloudflare Pages #
Now that we have a statically compiled site, we can publish it on a platform like Cloudflare Pages.
There are many platforms that allow you to publish static pages, such as GitHub Pages or Vercel. I chose Cloudflare Pages simply for convenience, since I had previously registered the “nicolabelluti.me” domain with Cloudflare to use Cloudflare Tunnel, which I’ll discuss in a future article3.
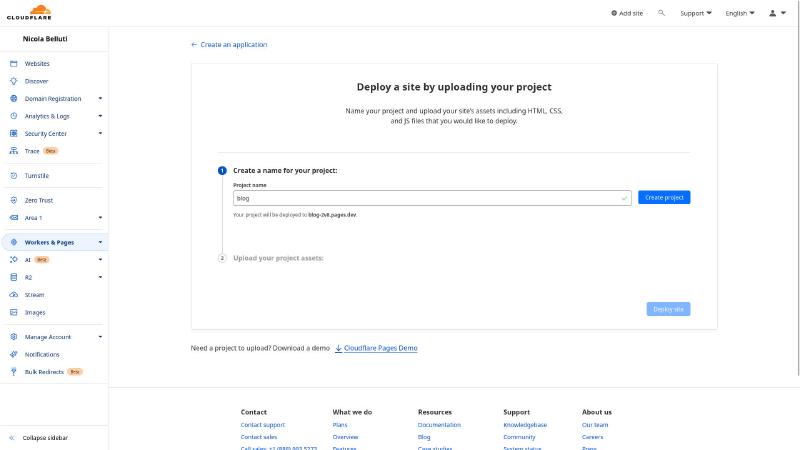
To create a site with Cloudflare Pages, go to the Cloudflare
Dashboard and navigate to Workers & Pages,
then click Pages.
Create a new project, give it a name, and save it without uploading any files.
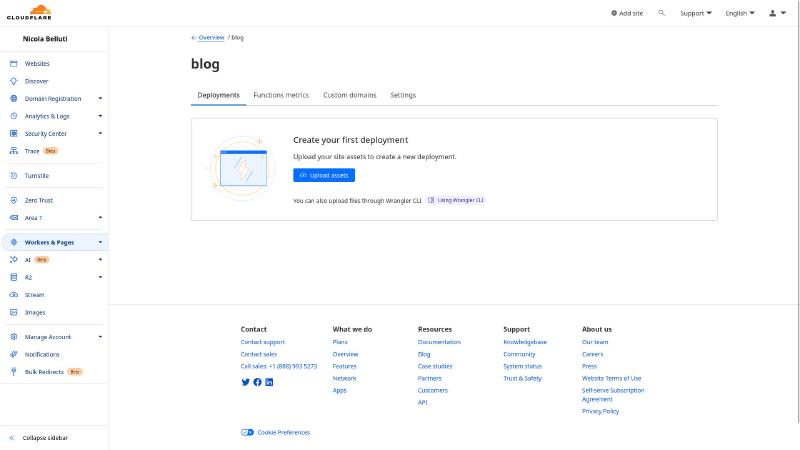
If you go back to the Workers & Pages section in the sidebar, you should see
the new project.
If you want to add your own domain, you can do so in the Custom domains
section of the project. Make sure to add both the base domain and the www.
subdomain.
Now we are ready to publish the site! To do this, go to the Deployments
section and click Upload assets.
Publishing the site using Wrangler #
Logging into the Cloudflare Dashboard and manually updating the site every time we need to change something can be a bit… sub-optimal.
For this reason, we can use a handy tool to automatically upload all our files from the command line: it’s called Wrangler CLI.
We can install it via npm with:
npm install -g wranglerTo use it, we’ll need an API key, so Wrangler CLI can update the site on our behalf.
To create a key, go to the “My Profile”
section of the Cloudflare Dashboard, then navigate to API Tokens > Create Token, and then Create Custom Token at the bottom of the page.
The token should have the following parameters:
- Name: Call it what you like; I’ll call it “blog”
- Permissions:
Account>Cloudflare Pages>Edit - Account Resources:
Include> Your account’s email - Client IP Address Filtering: optional
- TTL: optional, but I strongly recommend setting it
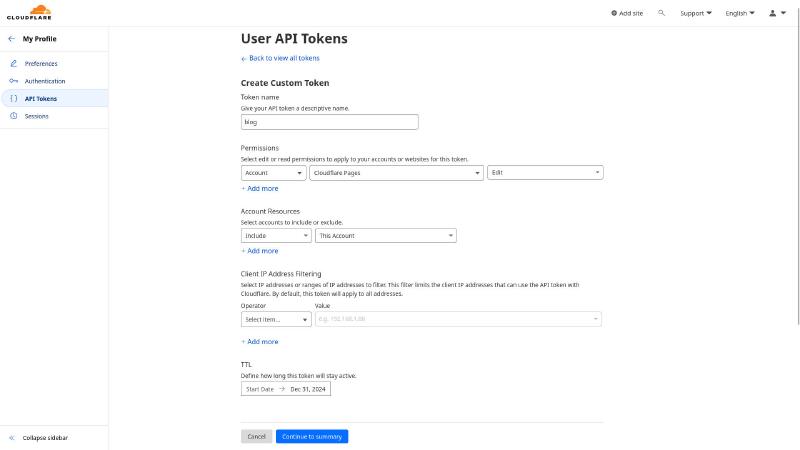
Click Continue to summary > Create Token and save the API token.
Finally, you need to copy the account ID by returning to the Cloudflare Dashboard and opening your domain. The account ID can be found on the right sidebar, under the “API” section.
Now, with the API key and the account ID, we can run Wrangler with:
hugo  # You need to compile the site first

export CLOUDFLARE_ACCOUNT_ID=<Your account ID>
export CLOUDFLARE_API_TOKEN=<The API token>
npx wrangler pages deploy 'public/' --project-name=<The project's name>-
old.reddit.com - ELI5 why CloudFlare is depicted as evil, and what’s wrong with using their DNS (1.1.1.1) ↩︎
-
Yes, I know that Cloudflare Tunnel is nothing more than a MITM, and I’ll also discuss how to replace Cloudflare Tunnel with your own Wireguard VPN. ↩︎